Get started
Welcome to your Jolla
We wrote this user guide to show you around our brand new phone. Your Jolla is different in many ways, and we want you to take full advantage of its features.
Hopefully you'll enjoy reading about how to use your Jolla - they won't let us come and demonstrate in person so we've tried to explain things as if we were showing you.
First we'll tell you a bit about the device itself and then we'll cover how to use it.
Overview
Your Jolla has two distinct halves, the front is the screen and the replaceable back is called 'The Other Half'. There are only two buttons and two sockets on the outside.
- Martin tells us : "Phones are built using layers, display layer, processor layer, back cover layer and others. In a way we turned the inner structure to the outside.
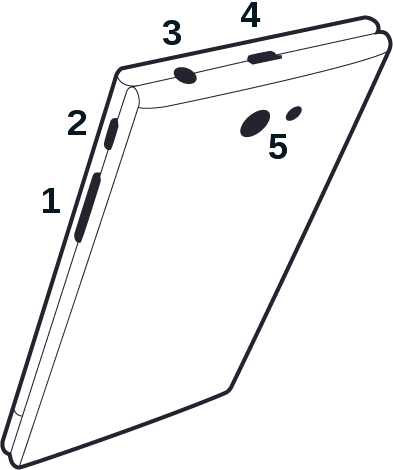
- Volume Key
Turn the volume up and down using the top and bottom of this key.
Volume up can also be used to take pictures when you're using the Camera. - Power Key
Turn on your Jolla by pressing and holding the power key until the device vibrates.
With your phone unlocked, press and hold the power key for a short while to switch off.
When your Jolla is on, you can use the power key to switch the display on and off. - Headphone Connector
Your Jolla will automatically use your headphones when you plug them into this socket.
Your Jolla supports the AHJ plug but not the OMTP plug.
The socket/jack/connector can also be used as a line-out for playing music through external speakers.
- Charging / USB
Your Jolla comes equipped with a MicroUSB 2.0 port which you can use to charge it, or to connect to other USB devices.
Charging can be done with any standard charger or using a PC, but using a dedicated charger is much quicker. - Camera / Flash
The main camera and flash are at the top of your Jolla - be careful where you put your fingers when you take a picture.
Inserting a SIM Card
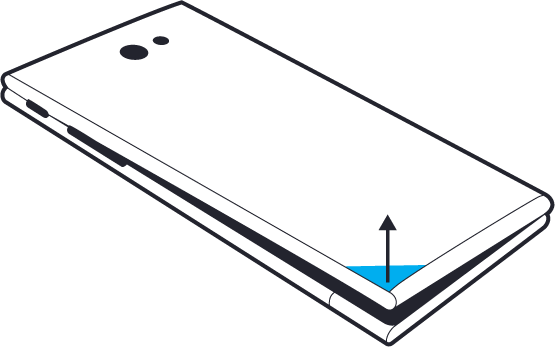
Looking at the back of your Jolla, lift the bottom left corner of The Other Half until it comes loose. Do the same to the bottom right corner, this will let you lift the whole cover off.
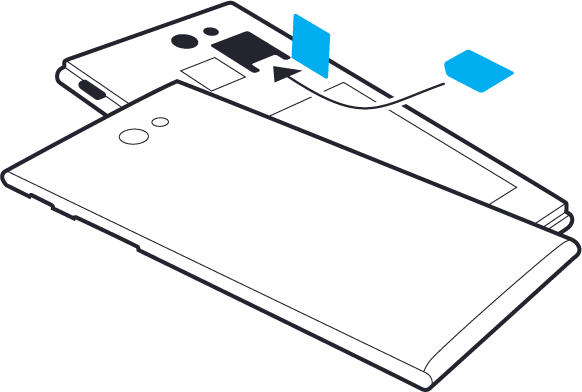
Lift the rubber flap that keeps the SIM card in place, and insert a Micro SIM into the empty slot. Push down the rubber flap and re-attach The Other Half by clipping on the top first.
Setup wizard
We know you are keen to get up and running, so when you start your Jolla for the first time, there is a setup wizard to guide you. It will ask for your preferred language and other details to personalise your Jolla and then help add accounts so you can see your social network, get your content and download apps. The wizard then shows you some gestures for using your Jolla.
Gestures - swipes, pulls, taps and flicks
Your Jolla enjoys being stroked and different strokes get different responses. To keep things clear, we describe the gestures first, so when we use them later in this guide you know what we mean.
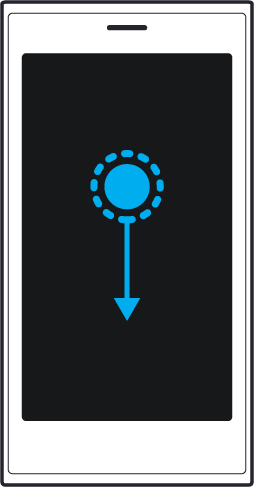
Waking up
Your Jolla's screen goes to sleep when you're not using it - if this happens, do not give your Jolla coffee. Instead, when you pick it up you just double tap on the screen or press the power button to wake it up.
A brief press on the power button sends the screen to sleep when you're done (your Jolla is still working but this helps the battery last longer).
A quick summary
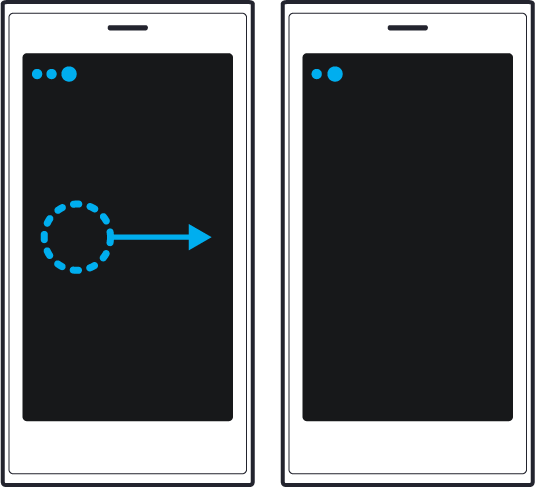
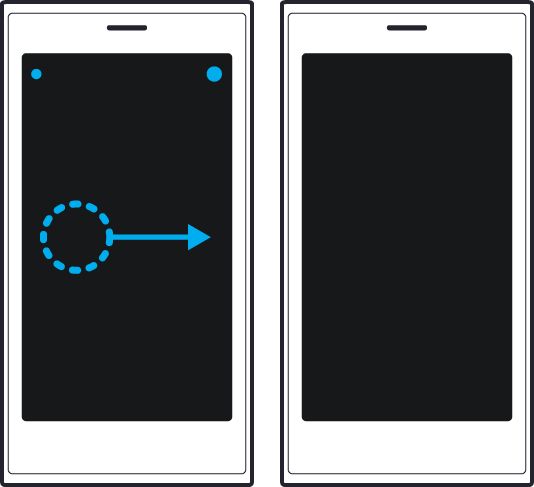
Swipes are used to switch between tasks and start with a touch off the edge of the screen - you can swipe from all sides. It's a bit like moving the whole screen.

Pulls are used to move around inside an application and start within the screen border - again you can pull in any direction. This feels a little like dragging the application around to see different parts of it - it's a natural movement when you have a list of things.

Flicks are just fast pulls - they get you to the end more quickly and are often used to open menus. You don't need to try hard to do a flick, they just happen as you get more familiar with your Jolla.
Of course you can tap on things too - or in some places you can do a long tap (when you press and hold) to access more detail.
What they do
Peeking and going back to Home
When an application is open, you can swipe from the left or right edges to go back Home. If you swipe slowly then this is called a 'peek' as it lets you just glance at the Home screen to see the time, battery, phone, WLAN and other status information. You can also see other applications' covers, which may show things like download information. Just slowly return your finger to the edge when you've seen the information you wanted.
- By using swipes and pulls you get the whole screen for your app without needing home or back buttons that waste screen space and are usually tiny.
Events view
Swiping up from the bottom of the screen always gets you to Events where you can see what's happening - swipe up again to close Events.
- You can leave Events with a sideways swipe to get back to Home too.
Closing applications
You can close an app by swiping down.
- Swipe down on the Lock, Home or Launcher screen to 'close' your Jolla's screen and send it to sleep.
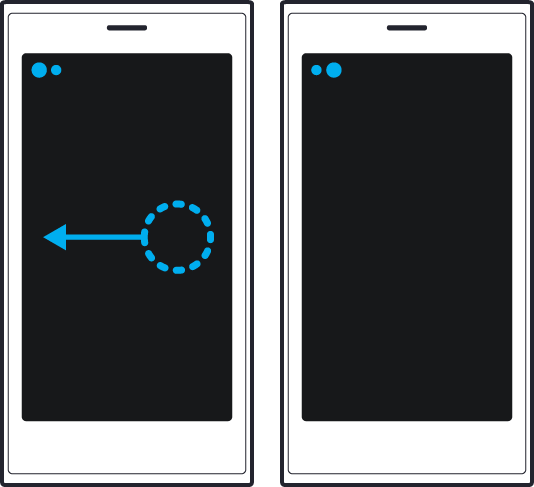
Pages … and the dots
Some apps use subpages to show you more information or to let you do things. You can recognise them from the dots in the top left corner - each dot is a page further on and a reminder that you can go back. The glowing dot shows which subpage you're on.
You often get to these pages by tapping an entry on the screen and the subpage slides in from the right.
To go back to the previous page simply pull right:
- Whenever there are dots on the page, you can go back to previous page by tapping the dots as well as by pulling right.
Sometimes the page is shown with a dot to the right of your current page - the glowing dot - this is a hint that there's a subpage which you can get to by pulling left.
Confirm and cancel
Whenever an app wants you to confirm some action, for example Accept or Save, you see a glowing dot on the top right hand corner. You can confirm by pulling left:
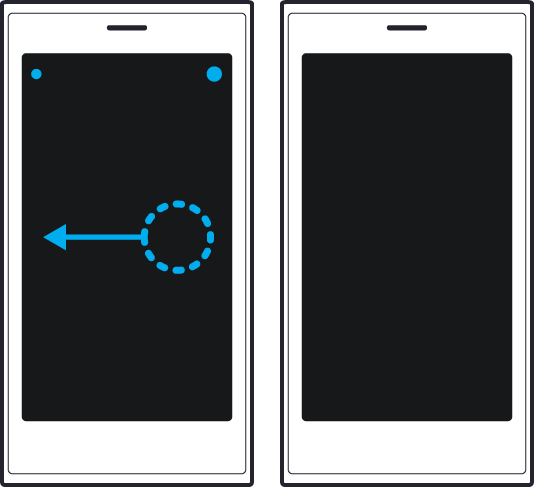
If you want to cancel the action, pull right:
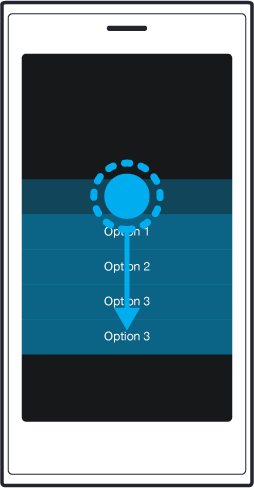
Pulley menus
Menus on your Jolla are called Pulley Menus because they use a pull to access them.
When you see a glowing strip at the top of the screen there is a Pulley Menu which can be opened by touching within the screen area and pulling down. Pull all the way down to lock the menu open and select items by tapping on them.
When pulling down you also feel a vibration, and see each menu item appear as you pull down further. As you get to know your Jolla better, you may prefer to select a menu item by releasing your finger as an item becomes highlighted.
The 'flick' we mentioned earlier is useful with Pulley Menus - just flick down and the menu opens all the way and lets you tap any item.
- Pulleys are common in the rigging on sailing ships.
- If you close an application by mistake instead of showing a pulley menu, start your pull from further down the screen - see how far down you can go.
- Some places have a Pulley Menu at the bottom.
More
Later there is more about some other common tasks like search, date and time pickers, and the keyboard, but first we cover the Lock, Home, Launcher and Events areas.
- Robin worked a lot on the gestures : "Building software is about love and passion - you can't just write something without putting pieces of yourself in there".
Lock, Home, Launcher and Events
The way your Jolla uses the screen is different - there are no fixed buttons or status areas and the whole screen is available for your apps.
 Jolla's main screen has three areas you get to by pulling up and down : they're called Lock, Home and Launcher. The Events screen lists all your notifications and you can access it from everywhere using a swipe gesture starting from the bottom.
You arrive at Lock when you wake your Jolla (it's easy to recognise as it shows the time). From here you pull up to see Home (showing your running apps and four useful app icons). Pull up again to see the app icons for all your other apps. Keep pulling down to go back.
When you click the power button, you see Lock, so let's start there.
Lock screen and icons
Apart from the clock, Lock shows if you've missed any calls, texts, emails and so on. It also tells you about updates and other notifications - it's generally an information screen with some useful shortcuts in the menu.
So, what can you do here? Quite a bit :
- Quickly see if there are any events and notifications.
- If you Swipe up (not Pull up) the Events view will reveal more information about the notifications.
- Pull up a little to check battery level and network status.
- Pull down a little to see the date at the bottom of a Pulley menu.
- Pull down more to quickly (un)silence the sounds, and get to the phone, camera or settings.
- After you've chosen some favourite Ambiences, swiping from the side lets you pick a favourite Ambience, which changes your ringtones and sounds too.
- Pull up more to get to Home.
If you're using the device lock to stop people seeing personal information on your device, your Jolla won't respond to some of these actions until you unlock it. To do that just pull up and you see the unlock screen where you can enter your unlock code.
- When you leave your Jolla on the Lock screen screen it goes back to sleep quite quickly.
- If Swipe from the side doesn't work, then set some favourite Ambiences from your photos in Gallery.
Here are all the Status icons you may see around the clock at some point:
![]() Indicates the battery status
Indicates the battery status
![]() An alarm is set
An alarm is set
![]() No sounds
No sounds
![]() Signal strength
Signal strength
![]() Bluetooth is activated
Bluetooth is activated
![]() WLAN (strength, available, no signal)
WLAN (strength, available, no signal)
![]() GPS is activated
GPS is activated
![]() Call forwarding is activated
Call forwarding is activated
![]() Roaming is activated
Roaming is activated
![]() The SIM card is not available
The SIM card is not available
![]() The SIM card is locked
The SIM card is locked
Notification Icons:
![]() Missed call(s)
Missed call(s)
![]() Missed SMS
Missed SMS
![]() Missed chat
Missed chat
![]() Missed Facebook notification
Missed Facebook notification
![]() Missed Twitter posts
Missed Twitter posts
Additional apps may provide more notifications; see their docs for details.
Icons and what they mean:
![]() Charging
Charging
![]() Bluetooth connected to another device
Bluetooth connected to another device
WLAN signal strength:
ranging from ![]() to
to ![]()
Also ![]() No signal
No signal
When new WLANs are found:
![]() WLAN available
WLAN available
Mobile data connection activity:
![]() Downloading data
Downloading data
![]() Uploading data
Uploading data
![]() No traffic
No traffic
![]() Traffic
Traffic
The mobile data icon can also have a number by the side - this indicates tethering may be in use by an app.
As you pull up you can see:
Signal strength ranging from ![]() (no signal) to
(no signal) to ![]() (full strength signal)
This indicator also tells you whether you've picked up a 2G or 3G signal.
(full strength signal)
This indicator also tells you whether you've picked up a 2G or 3G signal.
Note: even if you choose prefer 3G, your phone may drop down to a 2G signal - see Get connected for more details.
Battery Level ![]() or
or ![]() for a battery warning
for a battery warning
If you're in flight mode: ![]()
You may have noticed the LED at the bottom of your Jolla. This tells you about power and charging:
white : switching on
red : switching off
red blinking : battery very low, charging before booting
pale white : charging
pale white blinking : fully charged
It also uses the same colours as your main apps to tell you if you've missed something:
green blinking : missed call
blue blinking : missed message
yellow blinking : new email
Home screen and Covers
Home is where you see your running apps and switch between them - you can tell which is which by their Cover. At the bottom are your four favourite app icons.
More about the icons later, first let's see what a Cover is. When you swipe away from an app to do something else, the app keeps running behind a mini-display on Home; and that's called a Cover. Different apps have different Covers to display selected information, and many of them have active shortcuts for easy access to important parts of the app.
All Covers respond to a tap to go back into an app, and let you close an app by long tapping a cover and then tapping ![]() (or you can close all apps from the Pulley menu).
(or you can close all apps from the Pulley menu).
Covers can have one or two shortcuts which you activate by pulling left or right. It's easy to use: touch the action you want and pull to the other side of the cover. The cover changes to show what it's about to do. 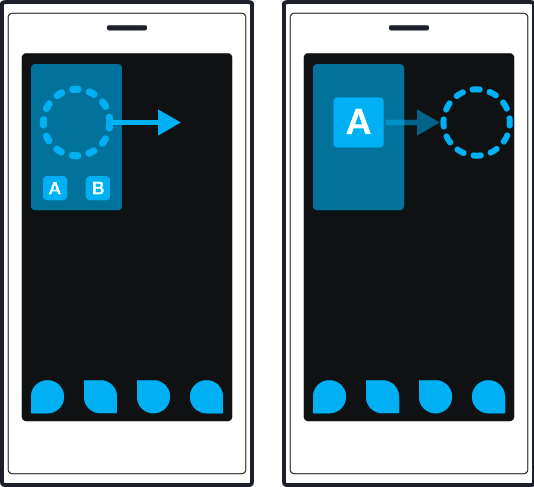
Remember that from within an app you can peek at Home (which also shows the time, and battery level) and see which apps you're running - try it.
To leave Home, you pull down a little way to peek at the time and battery level, and pull down more to get back up to the Lock screen. Pulling up takes you to the Launcher.
- Swiping from the side lets you pick an Ambience in Home too.
Launcher
The Launcher is where you find all your apps. Tap on any app to start it. When you have lots of apps installed, you pull up and down to scroll through them.
You can easily arrange your apps or remove ones you don't want - just give a long tap on any app icon and small delete icon appears on all the removable ones (some Jolla apps can't be removed). You can now long tap an app icon and drag it around or tap on the ![]() to uninstall that application (don't worry, if you tap the icon to uninstall by mistake you get some time to cancel it).
to uninstall that application (don't worry, if you tap the icon to uninstall by mistake you get some time to cancel it).
- The top of Launcher is visible in Home - so by dragging any app icon to the top you make it one of the favourites in Home.
What's happening : Events and Notifications
You can always see what's been happening with your Jolla's Events page.
Swipe up from the bottom edge to get to the Events screen. You see missed calls and texts, Jolla updates and all sorts of things. You also see any social network notifications - Twitter and Facebook show the status of new feeds and posts. You can do this from any screen, even inside apps. Quickly post a status to your social networks with "Share what's on your mind". There are more details about your social networks later.
Use the pull-down menu to clear all your notifications, or check for new ones using "Update".
Swipe from the bottom edge again to go back to where you were, or from the side to go to Home.
- The pull-down menu also lets you show or change your online messaging status - use the buttons at the top to set yourself to be "Available", "Away" or "Offline" for all your online messaging services. Tap on an individual service (eg. google-talk) to change your presence for just that service. This gives you additional choices too.
Common tasks
Some activities come up a lot: using the keyboard; searching; entering dates and times; cancelling or confirming something, so we'll cover those here.
There's lots of details here so feel free to just have a quick read through to see what's possible and then come back later when you need reminders.
Search
When you're looking for something and a search box pops up, just start typing and your Jolla will try and find what you want - the more you type, the fewer suggestions you'll get. So, for example, if you're looking for someone's details in the People app, you can start typing either their first or last names and your Jolla will narrow down the list.
On-screen keyboard
An on-screen keyboard pops up automatically when your Jolla needs you to enter some text. As you type, an image of the letter appears as feedback, and your Jolla may make some suggestions about what it thinks you're trying to type - if it gets it right just tap on the suggested word.
When you're typing, dragging your finger around will change the selected letter, so if you miss a key, just keep dragging and let go when you get the right one.
- If the suggested words don't include the one you want, scroll right to see more suggestions.
Tapping the shift key  makes it appear like this
  and the next single character will be in upper-case. If you want to type lots of upper case then tap it twice and it turns on fully :
For numbers and symbols tap the  and you get numbers and common punctuation; tapping
  toggles between these and a different set of symbols including currency. Tap the
  to go back to letters.
Also, you can select different language keyboards by pressing and holding the space bar and picking one.
Accents
Some letters can have accents (eg.ã or ç) - to access them, simply hold down a letter like "a" or "c". A range of accented alternatives will appear. Without letting go, scroll along, then let go when you reach to the letter you want. Letting go without scrolling will use the letter you originally tapped.
Moving the cursor
If you need to change any text just touch the cursor and move it (the text zooms in, to let you choose your cursor position more carefully), then type or delete.
- A trick to help move the cursor is to tap roughly where you want it to go and then tap and drag. This first puts the cursor under your finger and then lets you move it (thanks to our friends on the mailing list for this one).
Copy and paste
Long tap on a word and your Jolla starts by selecting the word you touch - a dot will appear at the beginning and end of the word; if you keep your finger down a little longer the whole line is selected, and then, shortly after, all the text.
To adjust the selection just touch one of the dots and move it. This changes the text selected and also zooms in to help you.
Just above the keyboard you'll see the text you just selected and a ![]() .
.
Tap the ![]() and your text will be copied to the clipboard, and the
and your text will be copied to the clipboard, and the ![]() will move all the way to the left.
will move all the way to the left.
To paste this copied text, tap within the document where you want the text to go, then tap the ![]() .
.
To cut instead of copy, select your text as above and tap the ![]() . You'll still get the
. You'll still get the ![]() , but your selected text will have been cut from the document instead of copied.
, but your selected text will have been cut from the document instead of copied.
Close the keyboard
Pull down within the keyboard to close it. The easiest way is to start with your finger somewhere in the top two rows of letters, and then pull down.
If you find this a little tricky at first, don't worry as you'll very soon get the hang of it!
Remorse timer
Do you ever wish you hadn't just deleted that photo! Well, the remorse timer is what your Jolla uses to help out. It waits a few seconds to give you a chance to change your mind. A slider appears and counts down; if you don't do anything then your Jolla completes the delete (or other action), if you tap the slider then the action is cancelled.
You can safely see a remorse timer in action by tapping on flight mode : ![]() in "Settings".
in "Settings".
Time Picker
For picking a time, your Jolla uses a clock with glowing dots for the hour hand and the minute hand. Move these to set the time - like setting the time on a clock. Tap the time in the top right when you're done. To cancel you pull right just below the clock.
Date Chooser
When you enter a date, your Jolla will show a year list for you to pick from; next it asks for a month and finally shows a calendar to select a day. You can still pull left and right to choose the month or pull down to change the year. The date you select appears at the top of the screen - tap this date to confirm, or pull right to leave it unchanged.
If you're modifying a date, your Jolla shows the currently selected date in the calendar view.
- You can still pull left to accept a date - just do it below the calendar view.
Get Connected
To copy music, videos and photos off your Jolla or to use the web, email, chat, or social networks you need to setup WLAN and Mobile Data networking - and probably Bluetooth and USB too.
Most of this is done in Settings: ![]() which can be accessed from Launcher or from a shortcut on Lock screen pulley menu.
which can be accessed from Launcher or from a shortcut on Lock screen pulley menu.
Mobile Data
When you have your SIM card in, your Jolla can tell you if you have a 3G connection. You configure this in Settings | System | Connectivity - Mobile Network.
You will see your Internet provider's service here. It may be as simple as "Internet" or maybe your mobile operator's name - your mobile operator tells your Jolla what name to use here.
Tapping on this name will tell your Jolla it's allowed to use your mobile network for data if it can't find a WLAN to use. A long tap lets you enter your settings manually (connection name, access point name, username and password) - your mobile operator will give you these details.
When your Jolla connects to a different mobile network (eg when you go abroad) you may have to pay 'roaming' charges. If this matters to you then this is where you tell your Jolla to never allow data roaming, always allow it or to ask each time.
The remaining settings allow you to choose your 2G/3G preferences, and let you pick a mobile network manually if you want to. "Prefer 3G" will connect to a network using a 3G signal whenever possible. However, it will use a slower 2G connection if that is all it can find. Some areas may not have a 3G network available. If you know you're in such an area, then you may want to choose "2G only" so your Jolla doesn't use up the battery looking for a 3G network.
is one of the four default favourites at the top of settings main page - tap it to allow/disallow mobile data.
Internet sharing
Your Jolla can act as a WLAN hotspot. This lets you share your mobile data connection over WLAN with other devices.
Go into Settings | System | Connectivity - Internet sharing. As well as WLAN hotspot, you'll see Network name (SSID) and Password. Your Jolla already has a network name and password set up but you can change these if you want to.
Whnever you tap "WLAN hotspot" to enable your hotspot, 2 things will happen. The first is your mobile data will be switched on, even if you have Data roaming set to "Do not allow". The second thing is that absolutely anyone searching for a WLAN will see your Jolla.
Anyone connecting to your hotspot will need the password, so be sure to make the password as complicated as possible, to prevent unwanted connections. Also, be sure to switch off your WLAN hotspot when you're finished with it.
WLAN
Set this up by going to Settings | System settings | Connectivity - WLAN. Then from the Pulley menu pick "Connect to Internet". You see all the networks your Jolla finds. Choose the one you want to connect to, and follow the instructions.
Before you set up your WLAN connection, you need to know:
- the name of the network you're connecting to
- the password for the network
For some WLAN connections you may also need to enter information about:
- Proxy configuration: No proxy, Automatic or you will need website and port details
- IP address details: Auto-retrieve or you will need IP address; subnet mask; default gateway
Sometimes when you connect to a WLAN hotspot you need to enter a login and password, or accept an agreement. To do this you will need to launch your Browser.
- When your Jolla sees a WLAN it knows it will connect automatically - you can just use the
on the Settings main page to enable/disable WLAN.
Bluetooth
If you have a wireless earpiece or headphones they most likely connect with Bluetooth. You can also share photos, contact details and other information with other devices over Bluetooth.
You set it up in Settings | System settings | Connectivity - Bluetooth. Tap to switch it on, and you see:
- the name of your Jolla (eg. 'My First One')
- visibility
- any paired devices
With Bluetooth switched on you can see local Bluetooth devices that want to be seen. They can't see you until you make your Jolla visible.
So, with Visibility set to 'On', your Jolla is visible to all other Bluetooth devices nearby, all the time, wherever you are. Set it to 'Off' and you won't be seen at all. Setting it on for a specific time lets you pair/share but then switches it off again.
Before you start 'pairing', for example, headphones with your Jolla, check your headphones manual to see how to pair them. Then pull down and search for devices - you should see your headphones (or whatever you're connecting).
- To control Bluetooth quickly, use the
switch on top of the settings main page.
PC Connectivity
You can copy files back and forth between your Jolla and your PC. You will probably do this over USB, but Bluetooth is sometimes an option too. (You pair your Jolla with your PC - see pairing Bluetooth devices above).
If you want to connect your Jolla to your PC using USB, connect the cable into your Jolla and then to the PC. Your Jolla will ask you what to use USB for - "Charging only", or "PC connection". Since you want to connect to your PC, choose this option.
Your PC should tell you that it found your Jolla - maybe saying 'New device detected', 'Found new USB device' - it depends on your PC operating system.
Your PC will then give you some choices - download photos, open with a file manager - that kind of thing. From then on you should be able to browse your Jolla on your PC just like an external hard drive or a USB stick. Your Jolla will show up with a few folders, including Music, Pictures, Videos, Playlists and Documents.
- In Settings | System settings | Connectivity - USB you can tell your Jolla what to do when you connect to a PC - it can ask what to do, assume PC connection or charging.
Import Contacts
There are a few ways to transfer contacts to your Jolla phone.
From a SIM card
Settings | Apps | People
You can choose to import from SIM card.
From a Bluetooth device
This will import all the contacts from a Bluetooth device (eg. another mobile) to your Jolla.
To get started go into Settings | Apps | People
When you tap "From device with Bluetooth", your Jolla will switch on Bluetooth and look for any Bluetooth devices nearby. Tap the device you want to get contacts from (eg. another mobile) and then tap "Accept". Your Jolla will ask if you want to pair with this device, and show you a number. If this same number is shown on the device you want to pair with, then you know you've found the correct device and can safely choose Accept.
You can also to choose to "Always allow connections from this device". This will make the pairing process easier next time - if in doubt, don't have this selected.
If all goes well, you'll see a message saying that the contacts have been imported. Tap "Show contacts" to go into People - you'll see all the new contacts in there alongside all your existing contacts.
To remove this device from your paired devices list, go into Settings | System - Bluetooth, and long tap the listed device.
From Gmail or Facebook accounts
Make sure you have a working internet connection
- In Settings | Accounts pull down to create an account.
- Pick the accounts you want and proceed as requested.
- Make sure "Sync" is in the services you choose.
- Save.
Contacts will then be copied from the account to the phone.
Another phone or VCF files
VCF files are a standard (but technical) way to import contacts. You can export these from other phones or desktop applications and then copy them to your device using USB storage or an SD card. It's easiest to put all your vcf entries in one file.
Now in Settings| Apps | People: tap on Import contacts "from contact file" and your Jolla will let you pick the vcf file you just copied over.
Ambience and The Other Half : Personalising your Jolla
You can change your Jolla to reflect what you're doing or how you're feeling. Your colours and your sounds. Joining The Other Half to your Jolla begins the transformation.
Ambience
Ambience begins with an image; your Jolla selects a highlight colour and uses that throughout. Your image then underlies all your applications.
You can have an Ambience for every mood - party mood, serious mood, work mood and so on. Play around and enjoy.
- Your Jolla is designed to make it seem like the applications appear on a layer of textured glass - that's why you can see through them to the Ambience.
Create a new Ambience
Images live in Gallery, that's where the magic starts. Go to ![]() and find a photo that you love.
and find a photo that you love.
Tap a fullscreen photo to see the split screen, then pull down and tap to create a new Ambience which will activate at once and also appear in the Ambience gallery.
Ambience: Favourites and sounds
A simple Ambience changes the highlight colour and the background but you can do more with a favourite Ambience.
From the main Gallery page tap on the Ambience gallery to pick an Ambience.
Tap ![]() to make it a favourite:
to make it a favourite: ![]() . Tap again to remove it from your favourites.
. Tap again to remove it from your favourites.
You can give a favourite Ambience a name and you can select a set of sounds too. Tap each sound event and pick from the list or from your music collection. Remember to save the Ambience.
- From the Home and Lock screens, swiping from either side shows your favourite Ambiences. Tap on one to activate it.
The Other Half
The Other Half is a smart cover - it changes your Jolla phone with a few easy moves.
Make sure you have a Jolla Account so The Other Half can download content from the Jolla store.
When you replace the back cover of your Jolla with a Jolla Ambience Other Half, it starts communicating and tells you what new Ambiences it has for you. You get a preview of the new Ambiences and it asks you if you want to add them to the ones you already have.
When the Ambience Other Half has finished installing the new content, you can create new favourite Ambiences with ringtones and colours for your different moods.
From now on changing the Other Half changes the Ambience.
- When we asked Marko about Ambience all he said was, "I like it!" - because he was busy setting different music as ringtones for each Ambience.
Using your Jolla - Phone
It's always easy to make a phone call:
If your Jolla is asleep, give it a double tap to wake it up and pull down on the pulley menu.
If you're doing something else then just swipe back home and tap ![]()
Making calls
Now you can tell your friends how much you love your new Jolla phone!
Simply pull down the pulley menu and enter a number or call someone from your address book.
If you dialed them recently they'll be in the Call history - tapping their name/number will call them or give you some options. It depends on whether you have Quick call set or not.
Navigating your address book is just like using the People application - when you pick a friend your Jolla will dial them (or ask you what number to use if they have more than one).
While you're on a call you can press ![]() to turn the speakerphone on and off
to turn the speakerphone on and off ![]() to mute/unmute. Sound will go to a headset automatically if you plug one in.
to mute/unmute. Sound will go to a headset automatically if you plug one in.
Of course you can use the volume keys if you need to.
If you need to enter any numbers during the call, pressing ![]() will bring up the dialling pad.
will bring up the dialling pad.
Tapping the cancel button ends the call, but you can also choose to "Send message" or "Call again". This is shown for a short time before going back to Call history.
- When dialling or entering international numbers quickly press the '*' button twice to get a '+'
- For complicated numbers (like conference calls or extensions) you can press '*' three times to get a 'p' for a pause which waits 3 seconds before dialling the rest of the numbers. Hours of fun !
- There's a shortcut for voicemail - once you've set up your voicemail, give a long tap on '1' (it has the voicemail icon:
) and it will dial your voicemail).
Taking calls
Answering a call is just as easy - whatever you're doing your Jolla will show the phone. Pull down the pulley menu and tap "answer".
When you don't answer a call, your operator can redirect it to voicemail or another number. This is covered a little later.
If you don't want to take the call, pulling up reveals a pulley menu. Here you have some choices. You can decline the call which hangs up the call immediately. You can let the call keep ringing without disturbing you; choose "Reply with SMS" or, if you're busy (or avoiding someone!) choose "Silence".
Hold
During a call, you can pull down to put that call on hold using "Hold Call". You can then pull down again to make another call by tapping "Add call" (this only works if your mobile operator supports it). You get back to your held call by pulling down and tapping "Resume".
- The reason for two steps to answering a call is to avoid accidentally answering if your Jolla is in your pocket - you never know what they might hear!
- Press the power button to silence a ringing call.
Ringtones, silent and vibrate
Change how your Jolla alerts you using the Ambience feature, and in Settings | System settings | Look and feel - Sounds and feedback.
Quick call
In ![]() | Apps | Phone there are some extra settings. Quick call allows you to return a call straight from the call log. When you see a received or missed call in your call history, tapping on the number with immediately return the call if Quick call is enabled. If it's not enabled, then tapping on a missed call will let you choose between "Call" and "Send SMS".
| Apps | Phone there are some extra settings. Quick call allows you to return a call straight from the call log. When you see a received or missed call in your call history, tapping on the number with immediately return the call if Quick call is enabled. If it's not enabled, then tapping on a missed call will let you choose between "Call" and "Send SMS".
Setting Voicemail and Call Forwarding
To set your voicemail number, and tell your operator what numbers to forward calls to when you can't take a call, you use Jolla's settings.
Your Jolla gets the current settings from your network and then show them to you - this can take a few seconds.
You can tell your operator what numbers to call
- "If busy"
- "If not answered"
- "Out of reach"
- "All.."
For each of these you can enter a phone number or select someone from People by tapping + at the end of the text field.
- You can quickly get to Settings from the Lock screen pulley menu.
Phone App cover actions
Most of the time you're not on a call so the cover actions are pull right ![]() to dial a number or pull left
to dial a number or pull left ![]() to call someone.
to call someone.
When your Jolla is ringing, you can answer it with ![]() .
.
If you're already on the phone and muted, you can unmute with
![]() .
.
Finally, you can hangup from your cover using ![]() .
.
- When there is only one option on the cover, you can pull either left or right.
Notifications
The green blinking LED tell you when you've missed a call. The Events screen will also tell you, including the number and the time they called.
- Tap on the notification to open the phone app and return a missed call.
Ongoing call
Whenver you're on a call, there's a "Call in progress" notification on the Lock screen.
Call history actions
A quick tap on a recent call dials them back.
Long tapping gives you some choices:
- Call duration - for information only
- Send message
- Open contact card
- Delete - from recent calls only, leaves any People entries intact
Emergency calls
Your Jolla can always make an emergency call - enter your local emergency number. From the PIN query and Device lock screens, first tap the emergency call icon, then enter the emergency call number.
People
Your Jolla is great for managing your friends. Tapping on ![]() shows your address book, where you can search for friends, add new ones and so on. Once people are in your address book, you can always pull down to Edit, Share, Link and Delete.
shows your address book, where you can search for friends, add new ones and so on. Once people are in your address book, you can always pull down to Edit, Share, Link and Delete.
Finding contacts & your favourites
People shows images of your favourites first, then people you've talked to recently and then everyone else.
You can always Pull down and tap "Show search". Then enter some text next to the ![]() and your Jolla shows contacts whose first or last names match.
and your Jolla shows contacts whose first or last names match.
Everyone else is shown by letter - tap on a letter and you can scroll through all your contacts whose name starts with that letter.
- The first 'letter' is a globe and it shows your online contacts so it's easy to start chatting with someone who's online.
- You can change the sort order to first or last name in settings.
- Opening someone's details and tapping the star adds them to favourites, tapping again takes them away. It's easy, try it and see!
Add contacts
If you know someone's details, pull down and choose "Add contact". You can add all kinds of details and, if you miss anything out, you can edit them again later.
If you have contacts in other places then the Import section should help.
- Tap the empty box with a
to add a picture to a contact.
- You can change the picture by tapping it. You can choose one from linked accounts or from the Gallery.
Save a number from a received call or SMS
From an entry in recent calls long tap on the number, then choose "Save as contact". Your Jolla shows you what it knows so far, with an option to Call or SMS. Pull down and tap "Save" to add more information.
From an SMS message pull left to show the sender details. Pull down & Save to add more details.
Link contacts
Everyone has lots of different numbers and addresses - email, IM, phone etc. Now you can link a friend to all their addresses. Open your friend's details, pull down and tap "Link". Your Jolla will make some suggestions - tap names to link them to your friend. If you want to add more or your Jolla didn't suggest what you wanted, pull down - "Add more links".
Share a contact
Find this in the People pulley menu, use it to send friend details over Bluetooth or email.
Edit or delete a contact
Open someone's details, and pull down the menu. Using "Edit", you can change any of their details. Choosing "Delete" gives you a few seconds to change your mind, just in case.
Name sort order
In ![]() | Apps you can choose to show last names first, and to sort by last name.
| Apps you can choose to show last names first, and to sort by last name.
- Matthew tells us that the great thing about working on People, is that it is the glue that sticks the different Jolla apps together.
Messages
Your Jolla is great for chatting using SMS or instant message services like Google or Facebook.
Sending and receiving messages is as easy as making phonecalls
too. Swipe to Home, then tap ![]() to see the conversations you've had.
to see the conversations you've had.
- The Events screen lets you know about new messages.
Send a message
Pull down and tap "New Message". Tap the ![]() to go to your address book, or start typing the name to Search. Tap their name and your Jolla shows you their details, say, phone number and IM name. Choosing their phone number means you'd be sending an SMS, choosing their IM address means you'd be sending an IM. Tap the
to go to your address book, or start typing the name to Search. Tap their name and your Jolla shows you their details, say, phone number and IM name. Choosing their phone number means you'd be sending an SMS, choosing their IM address means you'd be sending an IM. Tap the ![]() again if you want to send to more than one person. You can change the message type before you start typing, and you can remove someone from the message by tapping their name.
again if you want to send to more than one person. You can change the message type before you start typing, and you can remove someone from the message by tapping their name.
Tap the "?123" to add phone numbers manually.
When you're ready to type your message, tap next to the word "Change type" and start typing. There's a section on the on-screen keyboard if you've never used one before.
Read messages
The blinking blue LED tells you that you have new messages - swipe up to the Events screen for more details. Tapping Messages opens your unread message, or shows your messages in a list if they've all been read.
Reply to a message
Open the message, type, press "send" - it's as easy as that!
Switch between SMS and IM
When you tap Messages and open a message, you see all your conversations with a friend - sent and received; SMS and IM. Tapping on the words "Change type" lets you switch between SMS and IM. Tapping the text field (where the screen says "Hi") brings up they keyboard for you to type your message. As soon as you start typing, "Change type" changes to "Send" so when you finish typing you tap "Send" and your message is on its way.
You can scroll through your messages with the keyboard showing, but tapping on any message sends the keyboard away and tapping on "Hi" brings it back again.
- To send the keyboard away, just pull down on the keys.
Delivery reports
In ![]() | Apps there is a Messaging setting to enable/disable delivery reports. Whilst enabled, the delivery status will be displayed at the foot of each SMS you send.
| Apps there is a Messaging setting to enable/disable delivery reports. Whilst enabled, the delivery status will be displayed at the foot of each SMS you send.
Social networks
Your Jolla really links into your social networks.
The Events screen will let you know of any new social network notifications right next to any missed calls and messages; your contacts will be added to People and linked with any already there; diary events are added to the Calendar app and photos appear in Gallery.
But wait - there's more!
Any social chat or messaging appears in Messages and your Jolla can even post your status to all your networks at once if you like.
Set up an account
Go to Settings | Accounts, then pull down to add an account. Tap the account you want to set up.
Long tap on an account to remove it - there's a countdown before the account is actually removed.
- Choose more than one account and your Jolla will set them up one after the other.
See your friends' status
You'll see these on the Events screen. Tap ![]() and
and ![]() and so on to read any new posts.
and so on to read any new posts.
Comment on posts
Tapping on "Comment" below your friend's post shows the comments already made. Tapping "Write a comment" opens the keyboard for you to add your own.
Share photos
Open up ![]() and tap on the photo you want to share. Tapping it again shows the the ways you can share - Bluetooth, Twitter… Tap the place you want to share it.
and tap on the photo you want to share. Tapping it again shows the the ways you can share - Bluetooth, Twitter… Tap the place you want to share it.
- If you can't see where you want to share a photo, you can add an account from here.
Gallery
It lets you do all the things you'd expect - viewing, editing and sharing your photos and videos - and it's where you set your Ambiences too.
Tapping on ![]() will show the different collections you have - Photos, Videos and Ambiences. If it can see your online photos, your Jolla shows those too - in separate collections.
will show the different collections you have - Photos, Videos and Ambiences. If it can see your online photos, your Jolla shows those too - in separate collections.
There's more on Ambience in the Personalising your Jolla section.
Viewing photos
Tapping on "Photos" shows all your photos as thumbnails and you can scroll through them. Tap on a photo to see it fullscreen. Pull left and right to scroll through photos. To delete a single photo long tap on a thumbnail, and a delete option appears.
Tap anywhere on a fullscreen photo to bring up the split screen. Rightaway you can share over Bluetooth, Email, MMS or any other network you've already set up, or you can tap "Add account".
To get back to the thumbnails, tap to bring up the share menu and pull from left to right.
Deleting multiple photos
If you want to delete more than one photo at a time you can do that from the thumbnail view. Use the pulley menu to start picking them. The delete option then appears at the bottom of the screen.
Edit photos
Above the Share menu is a pulley menu - that's where you find Edit. Tapping "Crop" shows your original photo but lets you move around it and choose where to crop. Once you've settled on your view, tap the photo again to choose the final size and shape you want.
If you choose "Avatar" your Jolla opens up your address book so you can use it rightaway. You can also rotate from this menu.
- You can also crop a zoomed-in area. Choose "Crop" and then zoom into the photo.
Create a new Ambience
See the Ambience section for more on this.
View online albums
These are automatically created when you set up your online accounts. For instance, when you connect your Jolla to Facebook, you'll get a Facebook album in your Gallery. Depending on the social network, there may be other supported features - add comments, Like/Unlike etc.
View videos
These are found in the Gallery alongside your photos. Tapping on Videos will show you thumbnails of them. Tapping on a video selects it. Then tapping inside the video toggles between play and pause. If you tap outside of the video, it slides to the bottom of the screen, and opens up the same share menu you get for photos. Tapping anywhere below the split screen sends the share menu away.
- At the bottom of the screen is a slider. Use this to jump backwards and forwards through your video.
Share videos
You can only share videos over Bluetooth right now, and you can send small videos over email. Be careful though, as your email provider may block them.
Camera
You'll find it very easy to get started with the camera. There's no complicated setting up to do - just open the app and take a photo.
Taking photos
Most of the time the camera's automatic settings are just fine, and taking your first photo is as easy as tapping ![]() and then each time you tap the
and then each time you tap the ![]() , your Jolla takes another photo. You can also press the volume key to take photos.
, your Jolla takes another photo. You can also press the volume key to take photos.
To see the photos you've just taken, pull right and your Jolla takes you into a mini Gallery. Pull left to get back to the camera, or keep pulling right to scroll through the Gallery.
Your Jolla can take both portrait and landscape photos.
Alongside the ![]() you'll notice a
you'll notice a ![]() . If you set this to +1 or +2, your photo will come out lighter, if -1 or -2 it will be darker.
. If you set this to +1 or +2, your photo will come out lighter, if -1 or -2 it will be darker.
There are two cameras available in your Jolla phone, main camera and front camera. When you pull down the menu to change the camera mode, in the bottom right corner you find icon ![]() and by tapping it you change the active camera.
and by tapping it you change the active camera.
- You can change the location of the capture key. Long tap almost anywhere on the screen and you get a view with circles marking where you can move the capture key. You can choose a different location in both portrait and landscape mode. Great for left handed people.
Taking videos
Pull down the menu at the top of the camera screen, then tap ![]() . You can pull the menu, too, to make it active. Tap the
. You can pull the menu, too, to make it active. Tap the ![]() to start recording.
to start recording.
Videoes usually come out best if you take them in landscape mode.
- The
stays in the menu to remind you that you're in video mode. There's also a time counter on the screen.
Tap the menu and ![]() to get back to taking photos. Pull up to close the options.
to get back to taking photos. Pull up to close the options.
More advanced settings
When you pull down the menu to change the camera mode, you'll find other settings you can change:
When ![]() is selected, the camera decides if the flash is needed; when
is selected, the camera decides if the flash is needed; when ![]() is selected, the flash is always off; and when
is selected, the flash is always off; and when ![]() is selected, the flash flashes every time.
is selected, the flash flashes every time.
Colours in photos don't always match real-life so you may want to adjust what's called the 'colour temperature' to make them more realistic (this could get very technical so let's leave it there). Use:
 to let the camera decide on the settings
 if the conditions are cloudy
 for bright sunny weather
 for indoor lighting with modern energy-saving bulbs
 for indoor lighting with traditional bulbs
From the top right, you can change the way the camera focuses. Tap ![]() and the camera focuses automatically on the centre square each time you tap the screen (this is good if you want to focus on something and then adjust how you frame the picture); use
and the camera focuses automatically on the centre square each time you tap the screen (this is good if you want to focus on something and then adjust how you frame the picture); use ![]() and your camera will always focus on distant objects, or
and your camera will always focus on distant objects, or ![]() and your camera continually adjusts the focus using the centre square - this is useful when you take pictures of moving objects.
and your camera continually adjusts the focus using the centre square - this is useful when you take pictures of moving objects.
Although the bottom half of the menu lets you switch between the 2 cameras, there are many other things you can do from here. (This is when viewing the menu in portrait mode, landscape mode shows these items alongside the other items).
Light sensitivity lets you choose the ISO speed of your camera. This determines how much light exposure your photo gets, by adapting on how long the shutters is open for. Most of the time Auto will do the job. However, if you're taking photos in quite a low light you may want to use ISO 100 which keeps the shutter open for longer, allowing more light in. With this setting anything moving while the photo is being taken, will be blurred.
For moving objects, you would probably use ISO 400 - the shutter open for less time, less light in, and less blurring.
This is another area that could get very technical. So this is just a rough indication of what the settings are about. A photography guide would explain these concepts in much better detail.
While you're taking photos, your Jolla can display a grid to you out with composing your photo. This is a guide only, and will not show up on your actual photo. The thirds grid shows you 9 squares (3 x 3) - letting you easily see what will be in very centre of your photo.
The ambience grid is slightly different. Use this if, before you even take the photo, you're planning to create an ambience from it. You'll notice that this grid has a very small top row and a very tall middle row. That's because an ambience is created primarily from the middle of a photo (this is not quite the same if you crop a photo though).
If you want to set a time delay, your Jolla is able to do this. Use the menu to set a time delay of 3, 5 or 10 seconds. When you tap the ![]() , your Jolla will count down the seconds for you before taking the photo. Remember to set it back to 0s when you no longer want a delay.
, your Jolla will count down the seconds for you before taking the photo. Remember to set it back to 0s when you no longer want a delay.
- If you want to zoom in to take a photo, put 2 fingers on the screen and spread them apart to zoom in, and pinch back together to zoom back out.
Picture size
In ![]() | Apps there are some Camera settings.
| Apps there are some Camera settings.
Tapping "Save location" uses GPS coordinates to save the place that your photos are taken. This makes it very easy to remind yourself where your photos were taken. Tapping again will no longer save this information with your photo.
To change the resolution and shape of the pictures you take, tap on Photo resolution - there's a separate setting for the Main camera and the Front camera.
Web Browser
This is the way to access the Internet. You find it on Home: ![]() .
.
Along the bottom of the screen you'll find a toolbar with Browser icons.
Tap the ![]() see all your open tabs. Pull down to open a new tab. You can close the tabs you don't need anymore from this view, too. The number on the icon tells you how many tabs you have open.
see all your open tabs. Pull down to open a new tab. You can close the tabs you don't need anymore from this view, too. The number on the icon tells you how many tabs you have open.
This also opens up an address bar where you can enter a web address or just type search terms; the browser takes you straight to the search results.
![]() reloads the page.
reloads the page.
Tap ![]() to add the website to your favourites:
to add the website to your favourites: ![]() . Tap again to remove it. You find these below your tabs in
. Tap again to remove it. You find these below your tabs in ![]() .
.
- When you're reading a long webpage your Jolla hides the menubar so you can see the full screen. Give a little pull down and the bar comes back.
- Browser has an active cover which has
- tap and pull right to open a new tab; and
- tap and pull left to refresh the page.
Search and Private Data
In ![]() | Apps there are a couple of extra Browser settings - search engine (Google, Yahoo, Bing) and you can clear your private data - having 5 seconds to change your mind.
| Apps there are a couple of extra Browser settings - search engine (Google, Yahoo, Bing) and you can clear your private data - having 5 seconds to change your mind.
- We asked Dmitry about working on Browser - he said it's exciting because it consists of millions of lines of code yet it fits nicely into some simple Sailfish components.
Settings
Your Jolla can do a lot for you - and the settings application is where you tell it how you want things done.
When you open Settings you see some favourites and a list where you can get to each of the settings.
System settings covers how your Jolla looks and behaves, how it connects, backups, security, language, time and other information. The apps section is where you tell different applications how to behave.
Accounts is where you tell your Jolla about your social media, email and other web services.
System Settings
These settings are broken down into a number of areas which we'll go through.
- You can change which settings appear in the first page - you can press and hold one to add or remove it from your favourites.
Look and feel
- Display
You can adjust the brightness of your display, and select how long your display stays awake if you don't touch it. You can also change the orientation of the display. So you can have it always Portrait or Landscape, or change Dynamically - changing with the way you're holding your Jolla. Remember that not all apps support this Dynamic orientation.
- Shortcuts
Enable swipe closing to close an app or lock the screen by swiping down from the top. If it's disabled then a swipe down will take you to Home just like a swipe from any other direction.
- Sounds and feedback
You can select silent mode, when your Jolla vibrates, and adjust the default ringtone volume.
Default tones lists all sound alerts in your Jolla phone. You can tap to open each of them, and select a ringtone from your own music files, have no sound at all, or select a tone from a list of different ringtones.
You can have different Feedback sounds on or off, and what they alert you of, for example, low battery.
Connectivity
Many of these settings are covered in the Get Connected section so we won't repeat those here.
- Flight mode
You can turn Flight mode on or off for safety on flights or just to become unreachable. In flight mode you can manually turn WLAN and Bluetooth on without connecting to the phone network.
- WLAN
You can turn WLAN on and off, and you can reconnect to your saved WLAN networks from here. Picking "Connect to Internet" from the Pulley menu scans for new networks. When your Jolla finds a network it asks for a password if it needs one.
If you long tap on an inactive connection you can choose to forget it. For active or available connections, you can edit with a long tap. Editing allows you to see the security mode and set some technical options like proxy settings, DHCP, DNS and IP settings.
- Mobile network
Here you can control your mobile data and roaming, and select network mode and choose to select a network automatically. More details in Get Connected.
- Bluetooth
Covered in Get Connected.
- USB
You can select the default USB mode from here.
- Location
You can allow apps to use your location information automatically by tapping location and accepting the terms.
Sync and backup
- Bluetooth Sync
From here, you can copy your contacts from another device over Bluetooth. When you've copied contacts over, your sync history will be available here too.
- Backup
You can select which apps you want to back up. You can restore backups from here, too.
Security
Your Jolla supports two kinds of security numbers : a PIN and a Lock code. The PIN protects your SIM card (which someone could take out and put into their phone) and the Lock code protects the data on your Jolla.
- Device lock
Locking your Jolla means that people can't pick it up and trivially use it or see your data. You can set your Jolla to lock automatically after a few minutes, and tell it how many times you can enter the wrong Lock code to try to unlock it.
Once this is set, your Jolla locks itself as requested and you'll need to enter the Lock code to unlock it. This is separate to the PIN code used for protecting your SIM.
There's an option to allow the Feeds summary to be seen even when your Jolla is locked; this is useful for glancing at messages but you may prefer the privacy of keeping it hidden.
If you exceed the number of tries for the Unlock code, as a security measure, your data becomes inaccessible. You will need to contact Care to have your device reset.
- PIN code
The PIN code protects the SIM - so if someone takes your SIM out of your phone they still can't use it.
Your PIN is only requested when you switch on your Jolla (or when you want to change it).
If you've already set a PIN code, you have to enter it to choose a new one. If you put the wrong PIN in too many times, your SIM card gets de-activated. This means you won't be able to make calls, send SMS messages and so on. Every time you enter the wrong PIN your Jolla tells you how many tries you have left. After 3 tries, your Jolla tells you that your SIM is locked and you have to contact your operator for a PUK code to unlock it.
- Untrusted software
Normally, you install software from the Jolla store for Sailfish apps, or the Yandex store for Android apps. This setting will let you install software from other sources - either 3rd party stores or downloaded straight from the internet.
This is not something that we recommend so, if you enable untrusted software, be very careful what you install and where you get it from. Things can go very badly wrong sometimes, it is possible to cause per
- Developer mode
Your Jolla is open - that means you can play with it and change all kinds of things. The first step is to enable Developer mode and get a Developer tools view. You do need to know what you are doing - and if you want to learn more then our developer community would be really happy to help guide you.
A word of warning though: it is possible to damage your device and some modifications could void the warranty. By accepting the terms you agree that you understand the risks and changes to warranty.
Language and time
- Language
If you ever need to change the language your Jolla shows you then this is the place. Just scroll through the list of languages, and select a language.
When you make a change here, your Jolla asks you if that's really what you want to do. If you do want to make the change, just tap on "Accept" at the top of the screen. If you don't, then pull left to right or tap the glowing dots at the top left.
Your Jolla phone restarts after you change the language.
- Text input
Your Jolla tells you what the Active keyboard is. The language you selected for the phone and that you use most in your messages may be a language with different characters from English, such as German, Finnish or Chinese. That's not a problem, just tap the language name next to Active keyboard and select a favourite keyboard from the list.
- You can change the input language with a long tap on the keyboard space button.
Tapping Keyboards shows you the keyboards that your Jolla has available. Initially these are all enabled which can look cluttered - this setting lets you turn off the ones you never use and and holding the spacebar will only shows the ones you left enabled.
Tapping "Clear learned words" does what you'd expect, clear your Jolla of any words learned during its use. It restores your Jolla's dictionary to its original state - there's a remorse timer in case you change your mind.
- Time and date
Your Jolla usually keeps track of the time, date and even the timezone you are in. Sometimes the operator doesn't provide enough information for that and you may have to switch to manual updates and enter the time, date and timezone yourself.
Tap the time, date, and timezone, and you can change to correct ones.
Finally, you can also choose to display your time using AM/PM or a 24hr clock.
- Let your Jolla update the time and timezone automatically - it's good at it. If you're abroad and the time is wrong, check and change the timezone manually rather than the time.
- When you want to find a timezone you can search for a country or a capital city - the more you type, the shorter the list you can scroll through.
Info
- About product
The main thing this tells you is how much memory you're using. The rest is technical stuff, such as network addresses, like your Jolla's Bluetooth address and Wireless LAN Mac address. Also, your Jolla's IMEI (International Mobile Station Equipment Identity) is found here.
We've included our name as your Jolla's manufacturer, and your Jolla's product name and software version. There's also a pulley menu you can use to check for updates and start the update process. At the bottom you'll find some information on your Jolla's software - some free/open source and so on.
There's also an address at the bottom of this page if you would like to make a source code request.
- Battery
The battery section tells you how your battery is at the moment.
You can see how much charge the battery has left, if it is charging or discharging, and if your Jolla has a charger connected to it.
- Transfers
You can follow the transfers you have done and see any ongoing transfers.
- Data counters
Data counters help you keep track of data sent with your home operator, or roaming data usage, and WLAN data usage. You can clear the data counters individually if you are keeping track of the usage.
- Reset device
Please take great care here. From here you can restore your Jolla settings to their original values. This doesn't sound too bad. However, choosing "Clear device" removes all your personal data stored on your Jolla. So, you lose all your contacts, photos, videos, music - everything. You also lose all your updates and downloaded apps.
If you do tap "Reset device" by accident, pull back to System settings.
Apps
When you open Apps you'll see some of the apps are highlighted. Tap on these to see which settings you can change.
You'll find more on each app's settings in that app's section of the user guide.
- Pekka and Vappu worked on the settings and they like how application settings reflect the way Launcher looks.
Accounts
This page lists all accounts you have created on your Jolla phone and lets you create new ones by pulling down.
When you create an account you'll often be shown a browser page which asks you to login to the website. This provides a safe way to connect your Jolla to the account.
Tapping on an account opens a page of settings for that account. Different accounts will provide different services and settings which you can edit.
Jolla Store
Your Jolla likes new apps and, that's just what you'll find in Jolla Store - apps.
Launch the Store ![]() to see what's available. One thing you'll notice is that there's feedback about the apps. You can tell other Jolla users - and the Sailors who've put so much energy into writing the apps - what you think about them.
to see what's available. One thing you'll notice is that there's feedback about the apps. You can tell other Jolla users - and the Sailors who've put so much energy into writing the apps - what you think about them.
If you don't want an app anymore, then the Store lets you uninstall it too.
Jolla Account
You need this to get apps from the Jolla Store. When you go to Jolla Store for the first time, it tells you that you need an account. Set it up using the pulley menu in Store.
Jolla Store
The main page shows a stream of apps and reviews - see if something catches your eye. Scroll down to see apps by "Activity", "New apps", "Top apps".
At the bottom of the main store page you'll see "Categories", which lets you browse apps by category. There are some apps written by Jolla that you may want to install to get you started - these are in the "Jolla" category.
- From any category, pull down and choose "Sort" to see apps sorted by "Latest", "Most liked" or "Most downloaded".
When you see an app that interests you, tap it and your Jolla will show you a page of information about that app. There's a description and often screenshots. You can also see how many downloads there have been and how many people have given it a ![]() .
At the bottom of the screen are comments and a place for you to leave a comment too. Note that your name will appear alongside the comment.
.
At the bottom of the screen are comments and a place for you to leave a comment too. Note that your name will appear alongside the comment.
If you haven't got it, swipe left to install the app and it will download and install, letting you carry on browsing for other apps.
If you do already have an app installed then the pulley menu lets you remove it.
You can access your installed apps, and search in the Store from pulley menu.
- You can close the store whilst the app is installing and it will carry on in the background.
Updates
When an update is available for your device, or any app, you'll see a notification on Events. Tapping on the notification will take you to the Store where you can install the update.
- Bernd had the idea to name each system update after a different Finnish lake - there are a lot of them!
Android applications
As well as Sailfish apps, your Jolla can also run lots of Android apps. To get access to hundreds of Android apps, first you need to install Android support from the Jolla store.
Next, you need to get yourself a login for the Yandex store (this is where you'll download Android apps from).
Normally when you install an app from the Jolla store, you see an icon appear on the Launcher page. Android support doesn't have an icon of its own in there, you will just see the Yandex icon.
When you tap the Yandex Store icon on the Launcher page, you'll be able to see what Android apps you can download. Tap on an app button to find out more about the app and download it.
You can search for your favourite Android apps by tapping the magnifying glass at the top of the screen. Next to the magnifying glass, at the very top right is a menu button (3 vertical dots). Tapping on this brings up a menu. "My apps" in that menu shows you a list of your Android apps and lets you uninstall them if you want to. "Accounts" shows you the Yandex accounts you've set up on your Jolla (this is Yandex accounts only, not Jolla accounts). "Settings" lets you change the way the Yandex store works on your Jolla (for instance, whether Android apps are updated automatically and whether you want to allow these updates over mobile data which could turn out to be quite expensive).
Underneath the magnifying glass and menu button are 3 more buttons. These take you to the currently Featured apps, Games and Apps.
You'll also see a couple of Android-style buttons appear at the bottom of the page - one to take you back up a level and one to show you the Android apps you've installed recently.
Calculator
Your Jolla has a pretty good calculator app. Once you've downloaded in from the Jolla store, tap on ![]() .
.
It has the usual functions (+ - x ÷) but can also handle long and complicated calculations.
For a simple sum, tap the numbers, choose your operation and tap '='. If you make a mistake though, tapping the number you got wrong lets you edit it. The the result's automatically recalculated. Each time you tap '=', your completed sum moves up the page, and '0' is shown, ready for your next sum.
Pull up on the keypad to clear your calculations.
Pull right and left to see the numbers you type in longer calculations. Even when you can't see them all on the screen at once, you can still edit them.
Tapping a calculation's result tags that result - 'A'. That allows a result to be used in later calculations. This time, instead of '0' ready for the next calculation you see A's result.
You can re-use many results this way and keep track of a lot of calculations!
Calendar
Your Jolla calendar will be a real help in managing your time. It can show you events from all kinds of places - Facebook, Google, Exchange and so on.
Download it from the Jolla store first. Then open it up using ![]() . Calendar will show you the current month (today selected) at the top of the page, with today's events at the bottom of the page. Pulling left and right on the month takes you back and forward month by month. Pull down a little to peek at the days of the week, pull a little left to right to peek at the week numbers.
. Calendar will show you the current month (today selected) at the top of the page, with today's events at the bottom of the page. Pulling left and right on the month takes you back and forward month by month. Pull down a little to peek at the days of the week, pull a little left to right to peek at the week numbers.
- To get back to today's events, pull down and choose "Go to today".
Create new event
Pull down and choose "Create new event". This opens a new page where you fill in the event details. Things like name (you have to give your event a name), description and, of course, date and time. You enter these using Date chooser and Time picker that we looked at earlier.
Tapping on the date "Starts" or "Ends" opens up a Date chooser - each date you choose is show at the top of the page. Tap this date when you're ready to move on. You can pull down here if your event is in a different year.
Tapping on the time "Starts" and "Ends" opens up a Time picker - the time you choose is show at the top of the page. Tap this time when you're ready to move on.
Use the "Recurring" option if your event is to happen more than once, and the "Remind me" setting to set an alarm for the event.
When you've finished, tapping "Create" will save your event. You can always edit it again later if you need to.
You can change the alarm in
| System settings | Sounds and feedback. Change the "Calendar alarm" and tap "Accept".
When you've created an event there are still a few things you can do with it.
Edit an event
Open up your event, then pull down and choose "Edit" from the menu - this is the same information you saw when you created the event. Simply change any details you want to, and when you're finished tap "Edit" to save your changes.
Share an event
Sharing an event over Bluetooth or Email is as easy as opening the event and tapping "Share" on the pulley menu.
Tapping "Bluetooth" will switch on your bluetooth if it isn't on already, and show any nearby bluetooth devices. Choose the device you want to share the event with.
Tapping on "Email" will open up a new Email for you. When you've chosen a recipient and given your email a subject, you can pull down to "Save as draft", "Add an attachment" or just "Send".
Delete an event
Open the event and choose "Delete" from the pulldown menu. Just in case you've made a mistake, the Remorse timer lets you change your mind.
Manage calendars
If you don't want to see all of your events all of the time, pull down and choose Manage calendars. You can different calendars on and off. For example, if you don't want to see the Facebook events you've been invited to, just tap "Facebook" and you'll no longer see those events on your calendar. Tap again and they'll re-appear on your calendar.
You've probably already noticed the coloured line next to each individual event. This colour tells you which calendar the event belongs to - Facebook, Google, Personal etc. "Manage calendars" will let you change these to your favourite colours.
Birthdays
This is a calendar just for keeping track of your friends birthdays. Any birthdays set in People will appear in your calendar. You can add birthdays manually in People, but some social networking applications willad them automatically for you. When it's yourfriend's birthday, Calendar will show your friend's name with the Birthdays colour next to it (change this colour in Manage calendars). Also, if you don't want to see birthdays anymore, tap "Birthdays" itself (not the colour) in Manage calendars. This doesn't delete any birthdays from your contacts or your calendar, it just doesn't show them anymore. Go back into Manage calendars and tap "Birthdays" to start showing them again.
Clock
The clock lets you do quite a few things. You can set one-off alarms or let them repeat each day. You can set timers and there's even a stopwatch which includes a lap timer. Alarms and timers will sound even if the clock isn't running.
You choose each of these from the pulldown menu.
Alarm
Set the hour using the centre hand and the minutes using the outer hand. (We talked a bit about this in the Time picker). The top right corner shows you what time you've selected. You can give the alarm a name if you want to so you can have different alarms for different things. Who knows, you could have an alarm for anything - wake up is the obvious one but you could have one for 'take a coffee break' or 'walk the dog' - whatever you like! You don't have to give your alarm a name, you just can if you want to. When the top right corner shows the time you want, tap on this time to set your alarm. This will save your alarm and take you back to the main clock page - where you'll see details of all your alarms. There'll be a ![]() on the Lock screen too.
on the Lock screen too.
- Turning the hour (centre) hand anti-clockwise starts at 23:00 (or 11:00pm for 12-hour clock), clockwise first starts at 1:00, scroll round again to start at 13:00.
When your alarm goes off, pull up to dismiss or down to snooze for 5 minutes.
Choose a different alarm sound from ![]() | System settings | Sounds and feedback and change the "Clock alarm".
| System settings | Sounds and feedback and change the "Clock alarm".
- Each time you open the Clock app, you'll see all your current alarms and timers. Tap an alarm to have it set/not set, long tap to edit or delete.
Timer
Pull down and choose "New timer". Choose the duration in hours and minutes, give it a name if you like, and pull left to accept. You'll see your timer on the main clock screen, below your alarms. Tap the timer to begin the countdown, and again to pause. From a long tap you can Reset, Edit or Delete the timer.
Stopwatch
When you open Stopwatch from the pulldown menu, you'll see a lap timer and a total timer. Use ![]() to start the stopwatch,
to start the stopwatch, ![]() to pause, and
to pause, and ![]() to reset.
to reset.
Tapping ![]() adds a new lap.
adds a new lap.
- When you have a stopwatch running you can add a new lap or pause it from the clock's active cover.
Documents
You can view and share any documents on your Jolla by using Documents. Start by downloading it from the Jolla Store. Then, whenever you save a document, it shows up in the "Documents" directory. So when you open the Documents app you'll see al the files in that directory, including the file sizes and date they were saved there. This could be documents you download through a browser, or documents you copy over from your PC (or other device of course).
Just like the Gallery, Documents has a share menu. Tapping on an open file brings up the menu, which lets you share your document over bluetooth or email.
With this share menu open, you can also pull down to see more details about your document. As well as filename, size, type and so on, the page also tells you how many pages your document has. Pull left to right from this details page to get back to your document.
Tap on a document and pull left to right on the share menu to get back to your document list.
Documents can open all kinds of different file types including pdfs, text documents, spreadsheets and presentation. You can find a more complete list by tapping on "Documents" in the Jolla Store.
- To synchronise your email with a Microsoft Exchange server first install the Microsoft Exchange client from the Jolla store, then work through the process below.
Sending and receiving emails with your Jolla is not difficult at all. Your Jolla can even manage several email accounts for you, and send attachments.
To start sending and receiving emails, you need to install the email app from the Jolla store. When you've done that, there's a bit of setting up to do. Let's start with the easiest one to set up.
Googlemail
If you use Google for your email, you need to go into ![]() | Accounts | Google. Make sure that "Email" is selected, and choose "Save".
| Accounts | Google. Make sure that "Email" is selected, and choose "Save".
Now when you open up your email using ![]() , you'll see your Google mailbox. Use the pulldown menu to write a new email, or Update to check for new messages. The pulldown menu also lets you select messages for filing or deletion, and give you different options for sorting emails.
, you'll see your Google mailbox. Use the pulldown menu to write a new email, or Update to check for new messages. The pulldown menu also lets you select messages for filing or deletion, and give you different options for sorting emails.
POP/IMAP
If you want to set up POP3 or IMAP, go into ![]() | Accounts just the same, but pull down to add an account, then choose "Email".
| Accounts just the same, but pull down to add an account, then choose "Email".
From here, you can add POP/IMAP account information. This means you will need your username and password for your email account, and the server name (or IP address). Also any secure connection details (SSL, TLS or "Not in use"); and port numbers.
You've probably already used this information on your previous devices. If not, then you'll need to get this information from your email provider.
When you've finished this setting up, you'll be able to see your email from ![]() .
.
Synchronise
In ![]() | Apps |
| Apps | ![]() , you can also choose how often your Jolla will synchronise email with your POP/IMAP server. Tap next to "Enable scheduled sync to enable/disable sync'ing. Tap next to "Sync" to choose how often your mail syncs.
, you can also choose how often your Jolla will synchronise email with your POP/IMAP server. Tap next to "Enable scheduled sync to enable/disable sync'ing. Tap next to "Sync" to choose how often your mail syncs.
Reading emails
When a new email arrives, your Jolla will play the sound that you set in ![]() | System settings | Sounds and feedback, and there'll be a notification
| System settings | Sounds and feedback, and there'll be a notification ![]() on the Lock screen and on Events. Tapping on
on the Lock screen and on Events. Tapping on ![]() on the Events screen will open up your mailbox, or tap
on the Events screen will open up your mailbox, or tap ![]() on the Launcher screen.
on the Launcher screen.
- You can use the active cover to refresh your mailbox or start a new email.
Sending emails
Form your mailbox, pull down and choose "New email". Just like sending a message, tap the ![]() to go to your address book or start typing a name to search. Do this for each person you want to send the mail to. Tapping "Subject" lets you set a subject. Tap the "–" (just above your email signature if you have one) to start typing your message.
to go to your address book or start typing a name to search. Do this for each person you want to send the mail to. Tapping "Subject" lets you set a subject. Tap the "–" (just above your email signature if you have one) to start typing your message.
Pull down to "Send" your message straightaway, or "Save as draft" if you're not quite ready to send it yet.
Attachments
Like other email apps you've used, your Jolla can send attachments. While you're writing your email, pull down and choose "Add attachment". You can include "Documents", "Images", "Videos" and "Music".
Suppose you want to include a couple of images and a video. First pull down, "Add attachment" and tap "Images". Tap on the images you want to include - you'll see how many you've selected at the top of the page. When you've added the ones you want, either tap on the top right or pull left to accept. Then pull down and "Add attachment" again. This time choose the video you want.
When you've included all the attachments you want and you're ready to send your email, pull down and choose "Send".
Email signature
If you want to add a signature at the end of all your emails, go into ![]() | Apps |
| Apps | ![]() .
.
When you select signatures, your Jolla automatically uses. "Sent from my Jolla". If you want to use something different, tap on "Sent from my Jolla" and change the text.
Default account
In ![]() | Apps |
| Apps | ![]() you can also change the account that your emails are normally sent from. This is useful when you have several accounts but tend to send emails from the same account each time. It's much easier than having to make this choice every time you send an email.
you can also change the account that your emails are normally sent from. This is useful when you have several accounts but tend to send emails from the same account each time. It's much easier than having to make this choice every time you send an email.
Microsoft Exchange
If you use a Microsoft account for your email, that's not a problem. Your Jolla can connect to all sorts of Microsoft mail accounts - Exchange servers, outlook.com addresses, live.com addresses and so on. Be aware that there are several different setups though, and how you set this up will depend on which type of account you have. Don't worry, this guide will help you through the process.
The easiest accounts to set up are the outlook.com and live.com addresses (where you just get your email over internet). So let's look at those first.
When you've downloaded the Microsoft Exchange app from the Jolla store, go into ![]() | Accounts, pull down to add a new Microsoft Exchange account. You just need to enter your email address, username and password. When you accept these settings, your Jolla will log into to your email account and ask you what Exchange services you want to synchronise.
| Accounts, pull down to add a new Microsoft Exchange account. You just need to enter your email address, username and password. When you accept these settings, your Jolla will log into to your email account and ask you what Exchange services you want to synchronise.
Connecting to an Exchange server, for instance to get your work email, takes a little bit more effort. You will need some information from your network admin - likely your network username, password and server domain. This should be enough to get you connected in the office. To connect over the internet, you will also need a server address and a server port - again your network admin can give you those.
It's worth finding out all those things before you set up your Jolla, and it's not nearly as complicated as it sounds.
Once you've downloaded the Microsoft Exchange app from the Jolla store, you can set up your account. Go into ![]() | Accounts and pull down to add a new Microsoft Exchange account. Enter the information from your network admin.
| Accounts and pull down to add a new Microsoft Exchange account. Enter the information from your network admin.
Synchronise services
Email, people and calendar are automatically selected - they let you see your Microsoft mail in the Jolla Email app, your Microsoft contacts in your Jolla People app and any Microsoft calendar entries will appear in your Jolla Calendar. Tapping these entries will switch them off and on.
You can decide whether you want to share (sync) this information automatically or not.
Setting peak hours is basically the same as saying whether or not you're always available.
You can have different sync settings for peak and off-peak times. Eg. if you want your Jolla to always be up-to-date during your working hours set peak interval to 'Always-up-to-date' and set "Peak time starts" and "Peak time ends" to be your working hours and "Peak days" to be your work days.
You maybe don't want to be disturbed by work email outside of your working day. You can set this in "Off-peak interval" - there are lots of intevals you can choose from but essentially "Off" means your Jolla won't sync in off-peak times, "Daily" means it will sync once a day and so on. Play with changing these settings - you'll soon figure out what works for you.
As far as old data goes, you won't necessarily see the Microsoft mails and events that happened before you connected your Jolla - use "Sync old emails" and "Sync old events" to set how much of this old data you want to download. Be a bit careful with this though - if you have a lot of emails you may find the downloads take quite a while.
The last setting is "Resolve conflicts". Imagine you have an email you changed on both your computer (ie on the server) and locally on your Jolla. Which version would you want to keep? Choose "Priority to server" to keep the server version, "Priority to device" to keep the version you worked with on your Jolla - that's all this setting means.
You can always change any of these settings just by opening ![]() | Accounts and going into your Microsoft Exchange account.
| Accounts and going into your Microsoft Exchange account.
Having finished this setting up, you can get to see your emails, events and contacts simply by opening Email, Calendar and Contacts.
Music
Tapping ![]() will open Media player. From here you can see your music - all songs, or sorted by albums or artists - and any playlists you create.
will open Media player. From here you can see your music - all songs, or sorted by albums or artists - and any playlists you create.
There are the buttons you'd expect: ![]()
![]()
![]()
![]() - just tap to use them.
- just tap to use them.
Playlists
To create them, long tap on a song (from All songs, Albums or Artists) and Add to playlists will appear. Pull down to "New playlist", give it a name, and you're done. To add more songs to a playlist, long tap on each song, choose "Add to playlist" again. This time just choose from the list.
- If you have four or less playlists, they are shown as favourites at the top of Media.
Cover Actions
Media player has 3 of these:
With music playing, ![]() pull right to pause.
pull right to pause.
With music paused, ![]() pull right to play.
pull right to play.
Pull left ![]() to play the next song.
to play the next song.
Notes
Anytime you want to make a note of something quicky and without any fuss, you can use Notes.
Like the other Jolla apps, you download Notes from the Jolla store. Once it's installed you create your notes.
Use ![]() to open up Notes, pull down and start typing to create your first note. Pull down again to add another note, and another, and another.
to open up Notes, pull down and start typing to create your first note. Pull down again to add another note, and another, and another.
Each of your notes is colour-coded, so every time you create a new note, it's automatically assigned a new colour, a number, and appears at the top of all your notes.
Tapping on any note opens it up, tap anywhere in the text to bring up the keyboard. Pull from left to right to see all your notes.
There are still a few more things you can do with notes. You can change the associated colour - open a note and long tap the colour/number in the top right corner. This opens a page of colours for you to choose from.
With all your notes on the page (in other words not in any particular note), long tapping on a note brings up a menu. Choosing "Move to top" both moves your note to the top of the list, and gives it the number "1". When you don't want your note anymore, you can delete it using this menu.
There's no need to worry about saving files or any thing else like that. Notes takes care of that automatically.
- With Notes open, you can quickly start a new note from the cover on Home, just pull across the cover in either direction.
Maps
You can do a lot of things with Maps - save your favourite places, search for places and businesses by name or by category, and of course show a map of where they are. Maps will help you to plan routes too. There are lots of features so it's a good idea to spend a little time playing and finding out how it all works.
Anytime you open up Maps, your Jolla will try to find your location using GPS. For this to work, you need to have "Location" switched on in ![]() | System settings | Location.
| System settings | Location.
Your current location is shown in the top left tile. Any favourite locations are shown in their own tiles (more about favourites later). Below the tiles are any Recent locations, and then any Saved places.
Current location
Tapping on your current location (shown in the top left tile) opens up a map of the local area - you'll see a fullscreen map with your current location shown, together with any local saved places.
More about maps
You can get to a map in all kinds of ways - by searching, from Favourites, from Saved places and from Recent places. However you get there, the map will always show the place you chose in the middle. For instance, if you tap a Favourite, then the favourite will be in the middle of the map; if you chose a Saved place then the saved place will be in the middle of the map, and so on.
Try this a few times to get comfortable with it.
Having opened up a map, tapping anywhere will highlight the place you tapped and open up the Location split screen, tapping again returns the map to full screen.
Location split screen
It doesn't matter how you open a map, from Favourites, Saved places etc., you'll always see the same information - the map, some information about the location, "Directions" and "What's near".
At the very top there's the street name, town, postcode. This varies a bit according to the actual location. Below this you see how far away you are right now, and there's a ![]() so you can make this place a Favourite. There are some things unique to Favourites which we'll talk about here.
so you can make this place a Favourite. There are some things unique to Favourites which we'll talk about here.
Note: Directions has its own split screen view.
Directions
When you tap "Directions" you have some choices to make. Maps assumes you want to start from your current location ("My location") and go to the map location you're looking at. It also assumes you want to go by car and take the fastest route.
When you tap "My location" to change your starting point, the keyboard will appear. As soon as you start typing Maps starts finding possible places. The more you type, the closer the matches. This can range from a postcode, a specific business name, a street, town or even a country! Tap the entry you want and your starting location will be changed.
You can change your mind at any time by tapping ![]() .
.
The process is exactly the same for destination.
Tap "By" to choose between making the journey by car or on foot.
Tap "Route" to choose between the fastest route and the shortest route.
When you've finished making your route choices, tap "Show directions" to open the Directions split screen.
- Directions split screen
This shows very different information to the Location split screen.
At the top you'll see 'turn-by-turn' directions - numbered written steps plus arrows showing you which direction to go at each step. At the bottom is a map showing your route, with each numbered step clearly marked.
- Tapping on an arrow will highlight that step on the map; tapping on a step on the map will highlight the arrow/written instruction.
What's near
Tapping "What's near" opens a list of Popular places nearby. This gives you results in the same way as Search.
Search
The pulley menu lets you search for local amenities, or you can tap one of the categories to see a list of what's nearby. This is things like "Accommodation", "Shopping", "Eat & Drink", "Sights & Museums" and so on.
Because you've selected a specific business, you get a "Call" button and an "Open website" button. This means you can call them without ever having to tap in their number! "Open website" opens up the browser and takes you straight to their website.
- Tapping
will add this place to your favourites and give it its own tile on the Maps main screen. Tapping
removes it from your favourites.
Favourites
Just as your favourite contacts are shown at the top of the People, your favourite places are shown at the top of Maps.
Tapping a favourite opens up their details in a split screen. As well as the usual split screen information you also see what you called this location (eg. Home sweet home).
Again you get the "Directions" and "What's near" buttons, and the ![]() - tap this to remove it from favourites.
- tap this to remove it from favourites.
Recent locations
These are the places you visited recently and they're shown in a list immediately below Favourites. Tapping on a recent location will open the Location split screen. Pull left to right to go back to the Maps main page.
- Long tapping on a recent location opens a menu which lets you remove a place from your recent list, or Save to your Saved places.
Safety
General
- Don't make or receive handheld calls while driving.
- Never text while driving.
- Don't use at petrol stations.
- Don't look directly into your phone's flash, which may produce a bright or flashing light.
- Keep your phone and accessories away from small children. Small parts are a choking hazard.
- Don't dispose of your phone in fire.
- Don't hold your phone close to your ear while using the loudspeaker. Your phone can produce a loud sound and may damage your hearing.
- If you a use headset, pay attention to the volume level. Note also that you may not hear all outside sounds when using headset.
- Avoid contact with anything magnetic.
- Keep away from pacemakers and other electronic medical devices.
- Switch off when asked to in hospitals and medical facilities.
- Avoid extreme temperatures.
- Avoid contact with liquids. Keep your phone dry.
- Switch off when told to in planes and at airports.
- Don't take your phone apart.
- Switch off when near explosive materials or liquids.
- Only use approved accessories.
- Don't rely on your phone for emergency communications
Prevention of Hearing Loss

To prevent possible hearing damage, do not listen at high volume levels for long periods.
Radio frequency (RF) exposure
Your phone is a radio transmitter and a receiver. When switched on, it receives and transmits RF energy. When you make or receive a call, the phone controls the RF energy level–using only as much as it needs to make a connection to the network.
Understanding ‘Specific Absorption Rate’ (SAR)
The product is designed not to exceed the limits for exposure to radio waves recommended by international guidelines. These guidelines were developed by ICNIRP, an independent body of scientific experts. The guidelines include safety margins so that nobody, regardless of age and health, is at risk. The guidelines use a unit of measurement known as Specific Absorption Rate (SAR). The SAR limit for mobile devices is 2W/kg.
SAR is measured when the phone is at its highest transmitting power. However, the actual SAR of your phone is usually below the test level. This is because your phone is designed to use the minimum power necessary to make and receive calls.
This device meets RF exposure guidelines when used either in the normal use position against the ear or when positioned at least 5/8 inch (1.5 centimeters) away from the body. The specific maximum SAR values for this particular Jolla device are as follows:
Head SAR 0.546 W/kg
Body SAR 1.470 W/kg
For more information on SAR, go to http://www.sar-tick.com/
Limiting your exposure to radio Frequency (RF)
Please remember that, however you use your phone, RF exposure guidelines say that you should keep it 15mm away from your body while using the phone. Otherwise your RF exposure could exceed recommended limits. If you want to limit your exposure to RF, the World Health Organisation (WHO) gives the following advice:
‘Present scientific information does not indicate the need for any special precautions for the use of mobile phones. If individuals are concerned, they might choose to limit their own or their children’s RF exposure by limiting the length of calls, or using hands-free devices to keep mobile phones away from the head and body.’
You can find more information about this from the WHO fact sheet N°193 on the WHO home page at http://www.who.int/mediacentre/factsheets/fs193/en
Hardware Spec
Display
4.5" IPS qHD display 5-point multi-touch with Gorilla 2™ Glass
Camera
8 megapixel AF camera with LED flash 2 megapixel front-facing camera
Memory
16GB storage, 1GB RAM, MicroSD slot
Talk time & battery
9 / 10 hours (GSM / 3G approx.) User-replaceable battery
Processor
Qualcomm Dual Core 1.4GHz
Connectivity
GSM/3G/4G LTE* (works on 6 continents)
Design & dimensions
Height: 131 mm Width: 68 mm Thickness: 9.9 mm Weight: 141 g
- All the sailors we mention in the guide developed or designed that part of your Jolla.
- This guide was pulled together by David, Denise and Salla - we hope you enjoy it.